

Table of Contents
Electroforming, a unique and captivating technique in jewelry making, stands out for its use of electricity to shape metals into delicate designs. This method blends science and art to craft imaginative pieces.
Let’s explore everything there is to know about electroforming in jewelry design and how it has transformed the crafting of intricate jewelry.
What is Electroforming?
Electroforming transforms jewelry making by combining scientific precision with artistic flair, leading to unique, detailed pieces. This method uses electric currents to deposit metals like silver or copper onto a conductive surface, shaping them into beautiful jewelry.
First, a model of the jewelry, usually made from wax or another moldable material, gets a conductive coating, often graphite powder. This prepares it for electroforming. Then, it’s submerged in an electrolyte solution with a metal source, such as a silver or copper anode. Applying an electric current draws metal ions from the anode to the model, forming a metal layer on it.
Controlling the metal layer’s thickness is straightforward — the longer the model stays in the solution, the thicker the layer. After reaching the desired thickness, we remove the piece, extract the internal model material, and reveal a hollow, strong metal structure.
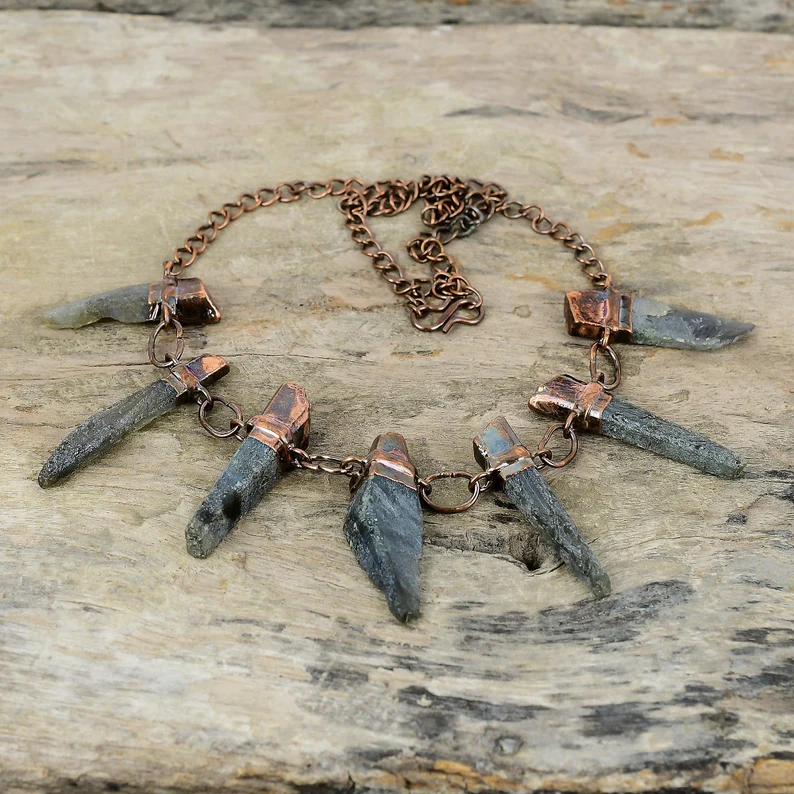
Electroforming enables the creation of intricate designs, organic shapes, and textures that are hard to achieve with traditional methods. It’s especially great for detailed, lace-like patterns. The technique’s adaptability makes it a favorite among designers who aim to innovate beyond classic jewelry making.
Over the years, technology advancements have refined electroforming, allowing for more control and opening up new design possibilities. Artists now craft complex, detailed pieces more than ever.
The two terms electroforming and electroplating are often used interchangeably by amateur jewelry “experts” online, as there’s quite a bit of confusion around these two terms. In addition, the fact that electroforming can technically be seen as an evolution of the electroplating technique also adds to the confusion between these two techniques.
In essence, both methods involve the layering of a metal solution over an object using a liquid bath and electricity. The difference is that the much simpler electroplating method only creates a thin layer of plating over something – either a jewelry piece of a different metal or parts of a gemstone.
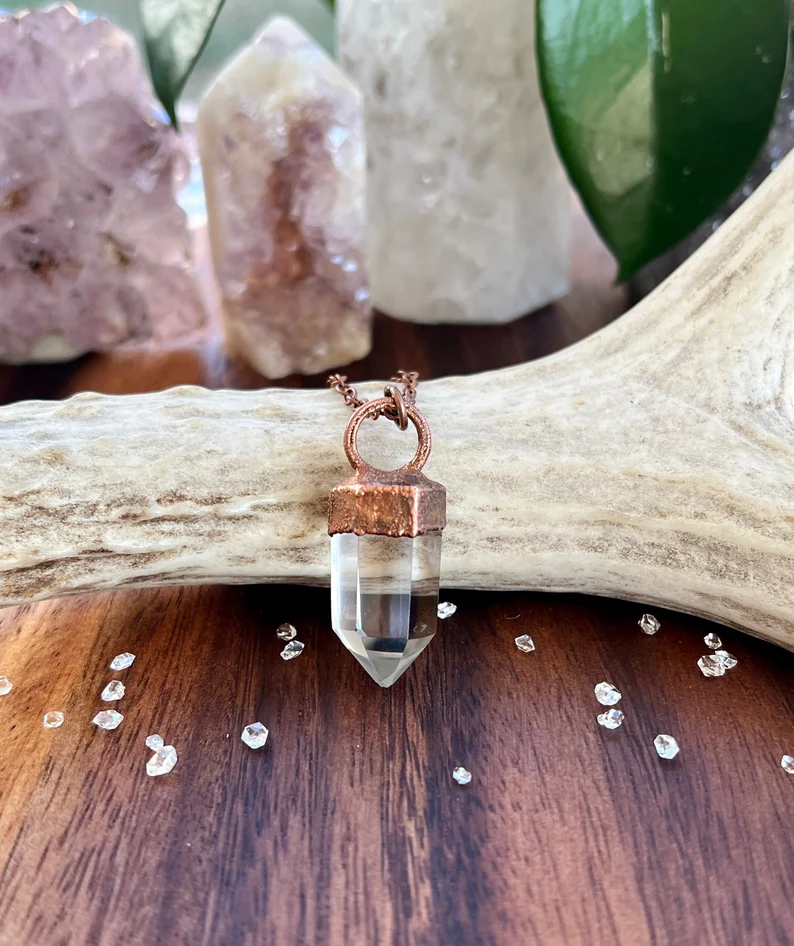
Electroforming, on the other hand, creates much thicker layers over a mold – thick enough to essentially be a jewelry piece in and of itself once the mold is extracted. That last part usually happens by liquefying the mold – usually made out of wax, rubber, or other similar materials – via needles pushed through one or two tiny holes in the electroformed jewelry piece.
Once the mold has leaked through those tiny holes, the jeweler is left with a brand-new jewelry piece in the mold’s shape. The hole left by the mold isn’t filled, so electroformed jewelry is technically hollow. But that doesn’t tend to matter as it’s thick enough to still be sturdy.
Is Electroforming the Same as Electroplating?
Electroforming and electroplating are both ways to use metal with electricity, but they do different things.
Electroplating puts a thin layer of metal on an object to make it look better, protect it from rust, or give it special surface qualities. In this method, the object gets a light coating of metal in a special bath, which makes it look nicer but doesn’t change its size or shape much.
Electroforming is different because it actually creates a new metal object. As mentioned earlier, you start with a model, often called a mandrel, and cover it with a material that electricity can pass through. Then, you put it in a special bath where metal slowly collects on the model, making a thick layer. When it’s thick enough, you take the model out, and you’re left with a hollow metal object that looks like the original model.
So, while electroplating is for putting a thin layer of metal on something, electroforming is used to make a whole new metal object that’s thicker and can have a lot of detail.
What Do You Need for Electroforming? – A List of Supplies
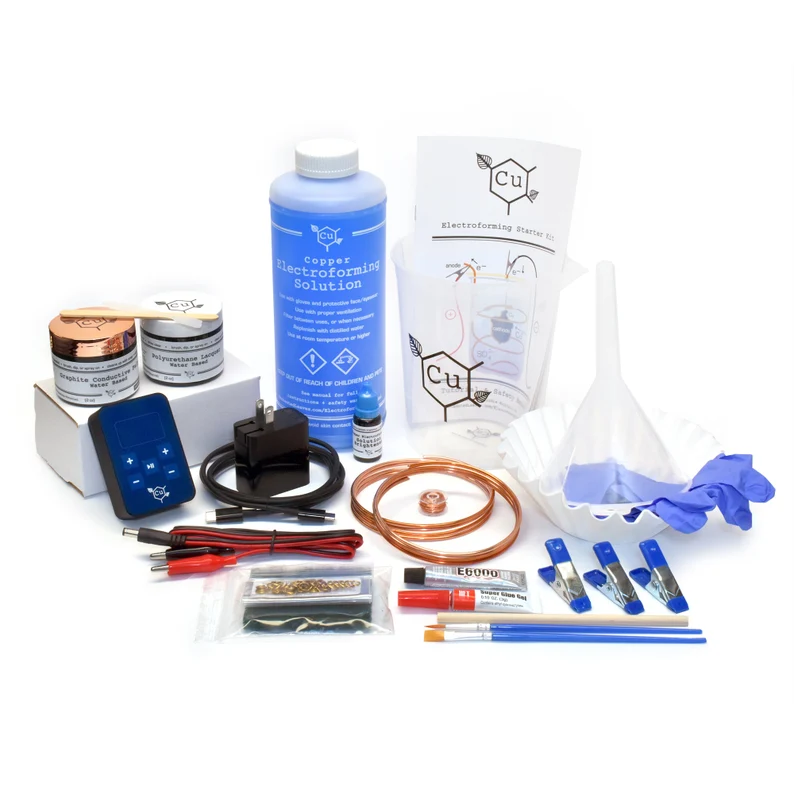
So, what should a good electroforming kit include? The exact list of supplies can vary a bit depending on what metal you want to electroform, including factors such as what its melting point is, and so on. Typically, however, this is what you’d need for your electroforming kit:
- A mold or mandrel of your preferred design and material (the material should have a higher melting point than that of the metal you’re going to use)
- A 10 Amp rectifier to supply the electrical current for the electrolyte bath
- The electroforming solution of the metal of your choice, be it gold, copper, or other
- 18-gauge copper wire
- Electroconductive paint
- Clamps
- A lead set 8-gauge wire for bus bars
- Good bath containers with lids and acid resistance
- Metal anode
- Other auxiliary supplies you might want to consider, depending on what you want to create. This can include items such as red lacquer to protect part of the mold/gemstone you’re electroforming over, electroclean solution, acid drip solution, and replenishing brightener.
With all that prepared, let’s go over the step-by-step process of electroforming your own jewelry.
What’s the Process of Electroforming?
1. Prepare the jewelry designs.
The first step in most cases would be to plan out what you want to make and prepare your mold or mandrel. Picking the right material here is key as many materials can’t go above certain temperatures. For example, in the past, electroforming bath needed temperatures as high as 140°F to 176°F (60°C to 80°C) which was too high for wax.
Today, however, electroforming baths can be used at temperatures between 104°F to 113°F (40°C to 45°C) which allows for wax jewelry molds. Once you’ve picked the right material, you can create the mold out of it. Depending on the size of your bath container, you can make multiple jewelry pieces at the same time so you might want to prepare several mandrels.
2. Submerge the mandrels in the vat.
Once the mandrels are done and dry, you can assemble them copper wire rack and suspend them in the electroforming solution inside the vat. Place the metal anode in the vat alongside the mandrel and secure them both with clamps so that they aren’t touching each other or the walls of the vat.

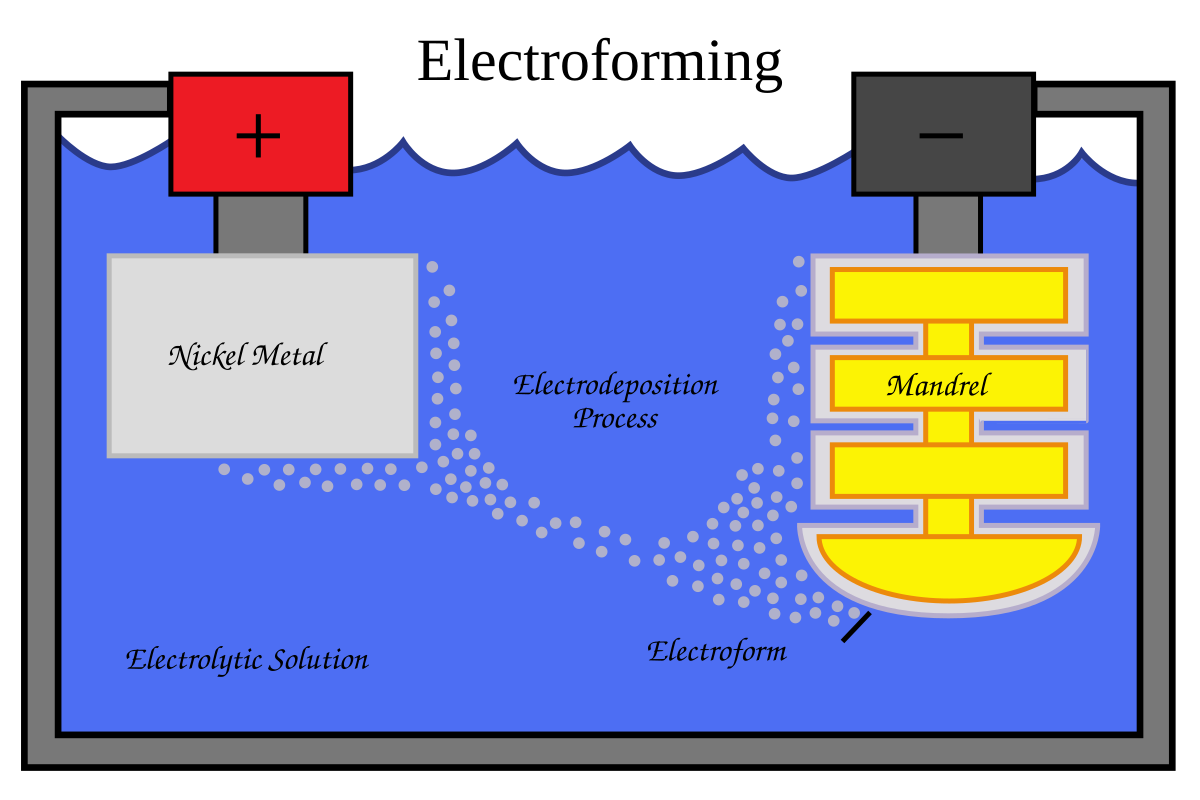
The clamps themselves should be connected to the Amp rectifier which would be supplying the current into the vat through the anode and the mandrel. This way, the mandrel will be acting as the cathode in the electrolyte solution as shown in the above image.
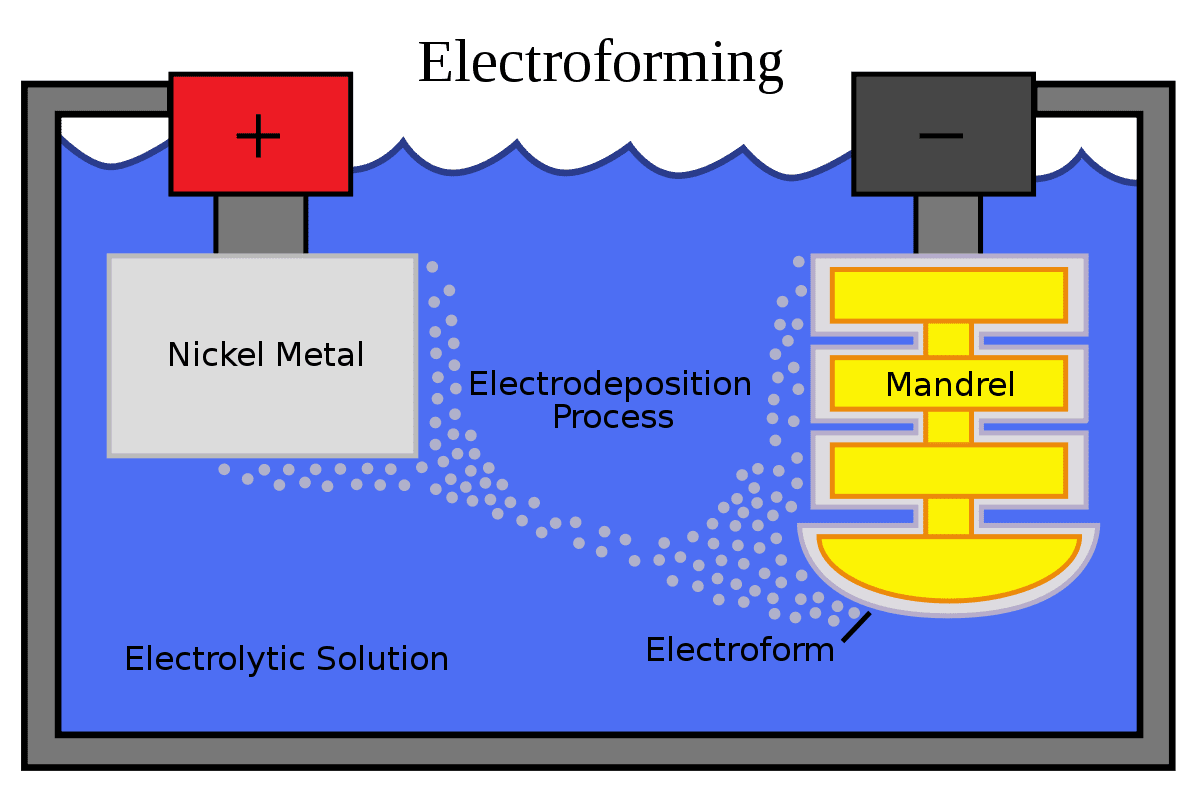
Once the Amp rectifier starts working, the electrodeposition process will initiate and layers of metal will start forming over the mandrel/cathode as seen in the diagram above.
3. Turn the rectifier off and take out the mandrel when it’s ready.
The exact time you’d need to wait will depend on the type of metal you’re using and the jewelry thickness you’re looking for.
Normally, gold can take as little as 14 hours to electroform nowadays but certain other metals, electrolyte solutions, and setups can need days, as was the case usually in the past.
This means that you’ll need to carefully research the specifics of the exact jewelry metal you’ve chosen in detail before you proceed here. We’re only looking at the general basics of electroforming.
4. Extract the mandrel from inside the electroformed jewelry piece.
This step can also vary depending on what material you’ve used for the mandrel and the jewelry itself, what its design is, and so on. If the jewelry has encompassed the mandrel completely, you will need to extract it via one or more small holes in the jewelry and by melting the mandrel out of the jewelry.
The holes themselves can later be hidden in various ways – by a gemstone and its setting, with jewelry clips attaching it to a different part of the jewelry, and so on.
Can You Use Electroforming with Non-Conductive Materials?
Yes, you can also use electroforming with materials that don’t conduct electricity, like plastics and glass.
When you use electroforming with a non-conductive mandrel, the process is a bit different. Instead of covering the parts where you don’t want metal, you need to make the areas where you do want metal conductive. This means you put a special coating on the parts of the model where you want the metal to stick.
You can apply this coating in different ways: by hand, using chemicals, or with special vacuum techniques. A common method is painting or spraying the model with a conductive metallic paint, which leaves a thin layer of a metal like nickel or silver.
After you’ve applied this conductive layer to the mandrel, you can proceed with the electroforming process just like you would with a metal model.
What are the Challenges of Electroforming?
Electroforming can be tricky and needs a lot of skill and attention. As mentioned earlier, it usually works best with materials that can conduct electricity. So, if you want to use materials like plastic or glass that don’t naturally conduct electricity, you have to add a special conductive layer to them first. This extra step can be complicated and take a lot of time.
Another big challenge is making sure the metal layer comes out evenly, especially on complex designs. If it’s not even, the final piece might have weak spots or not look right. This means you have to be very precise in how you do electroforming.
Also, you need some special equipment like rectifiers, baths for the electrolyte solution, and various chemicals. Knowing how to use all this equipment safely and correctly is super important. Plus, because you’re working with chemicals, you need to be careful and think about safety and the environment.
All these challenges mean that while electroforming can create amazing things, it needs a careful and skilled approach to get it right.
Pros and Cons of Electroforming
Electroforming jewelry does require a bit of technical and chemical knowledge, which can make it seem daunting and difficult to get into initially. Once you learn the basics, however, the rest is just a matter of getting a few relatively low-cost supplies to start with.
Pros of Electroforming
Electroforming has quite a few benefits for professional and amateur jewelry makers alike. Here’s a Quick Look:
- Electroforming allows for the creation of intricate and detailed designs that might be difficult or impossible with traditional jewelry-making techniques.
- The process can produce hollow, yet sturdy pieces, making the jewelry lightweight and comfortable to wear.
- It uses materials efficiently, as metal is only deposited where needed. This can lead to less waste compared to other methods like casting.
- Electroforming can create unique textures and surfaces that are difficult to achieve through other methods.
- It can be used with a variety of metals, expanding the range of design possibilities.
Cons of Electroforming
Of course, this doesn’t mean that there aren’t some drawbacks to this jewelry-making method as well. The main disadvantages of electroforming are:
- Limited to Conductive Materials: Electroforming requires conductive surfaces, which can limit the materials you can work with directly. Non-conductive materials need a conductive coating before the process.
- Time-Consuming: The process can be slow, especially for thicker pieces, as it takes time for the metal layer to build up to the desired thickness.
- Equipment and Skill: It requires specialized equipment (like an electrolyte bath and rectifier) and a certain level of skill and understanding of the process, which might be challenging for beginners.
- Control Over Thickness: Achieving uniform thickness can be challenging, especially for complex shapes, which might lead to weak spots.
- Chemical Handling: The process involves handling chemicals and requires proper safety measures, which might not be suitable for all environments.
Wrapping Up
Electroforming is a special way of making jewelry that mixes art with science to create designs you can’t get with traditional methods. It has some challenges, like using materials that don’t conduct electricity and making sure each piece is perfect.
But the beautiful and detailed results you get are worth the effort. For those who are ready to tackle its tricky parts, electroforming lets you make really detailed and light jewelry, taking jewelry design to a whole new level.


