
Table of Contents
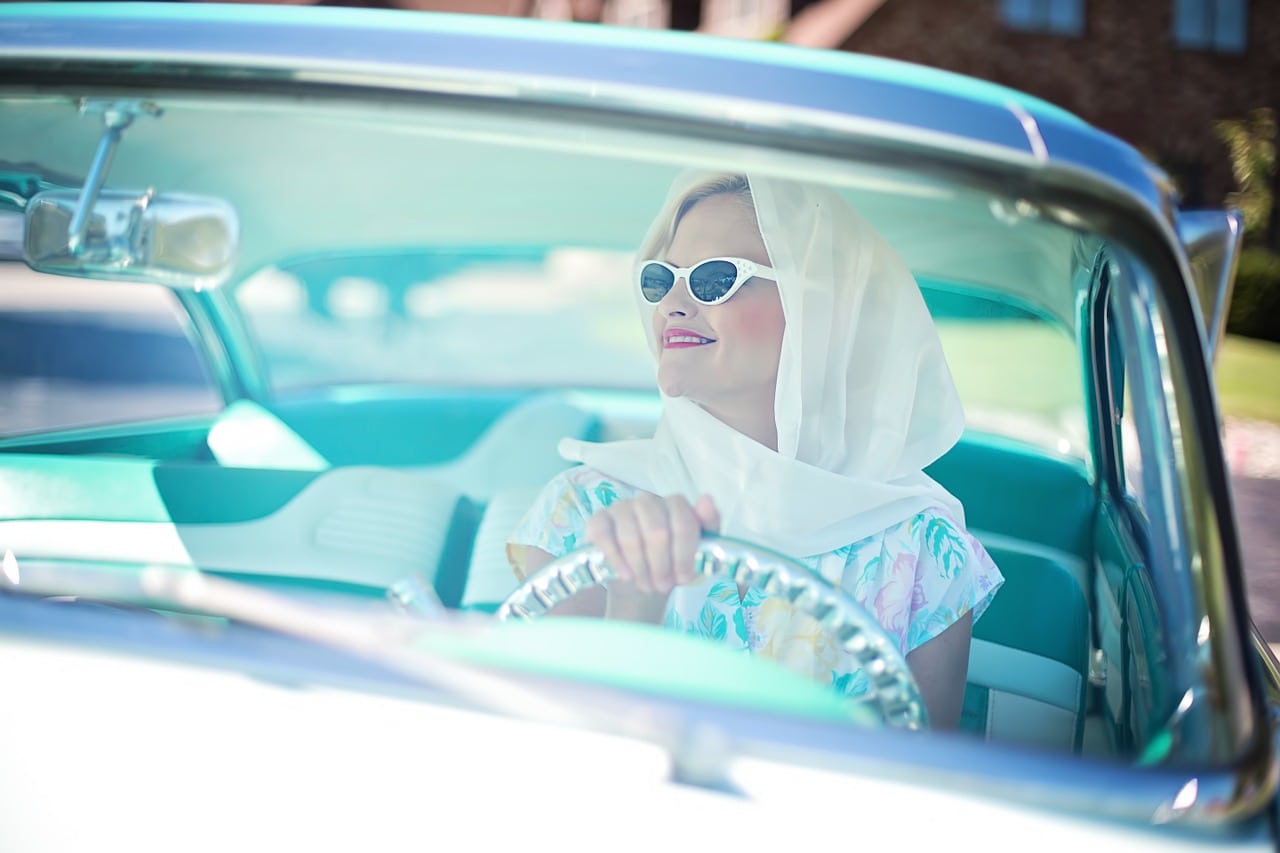
The 1950s was an exciting time in our history since this was the decade after WW2. The makeup and beauty industries boomed. This was augmented by practical factors such as a number of labor-saving devices coming to market, freeing up women’s schedules and allowing them to focus more on their makeup and beauty routine.
In the 50s, women were ready to go back to the glamor of the 1930s but keeping the more natural approach of the 1940s.
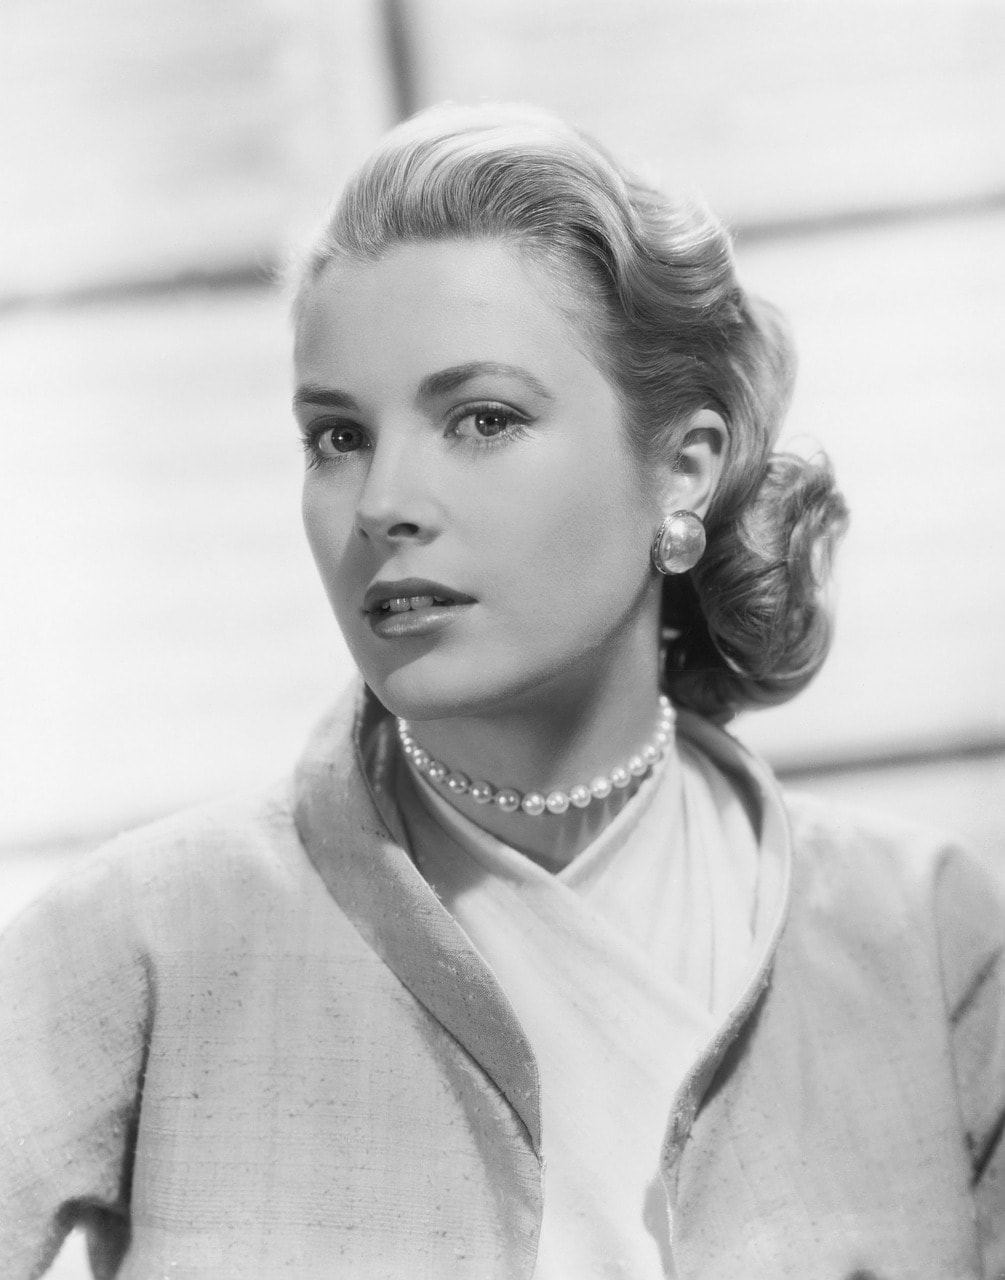
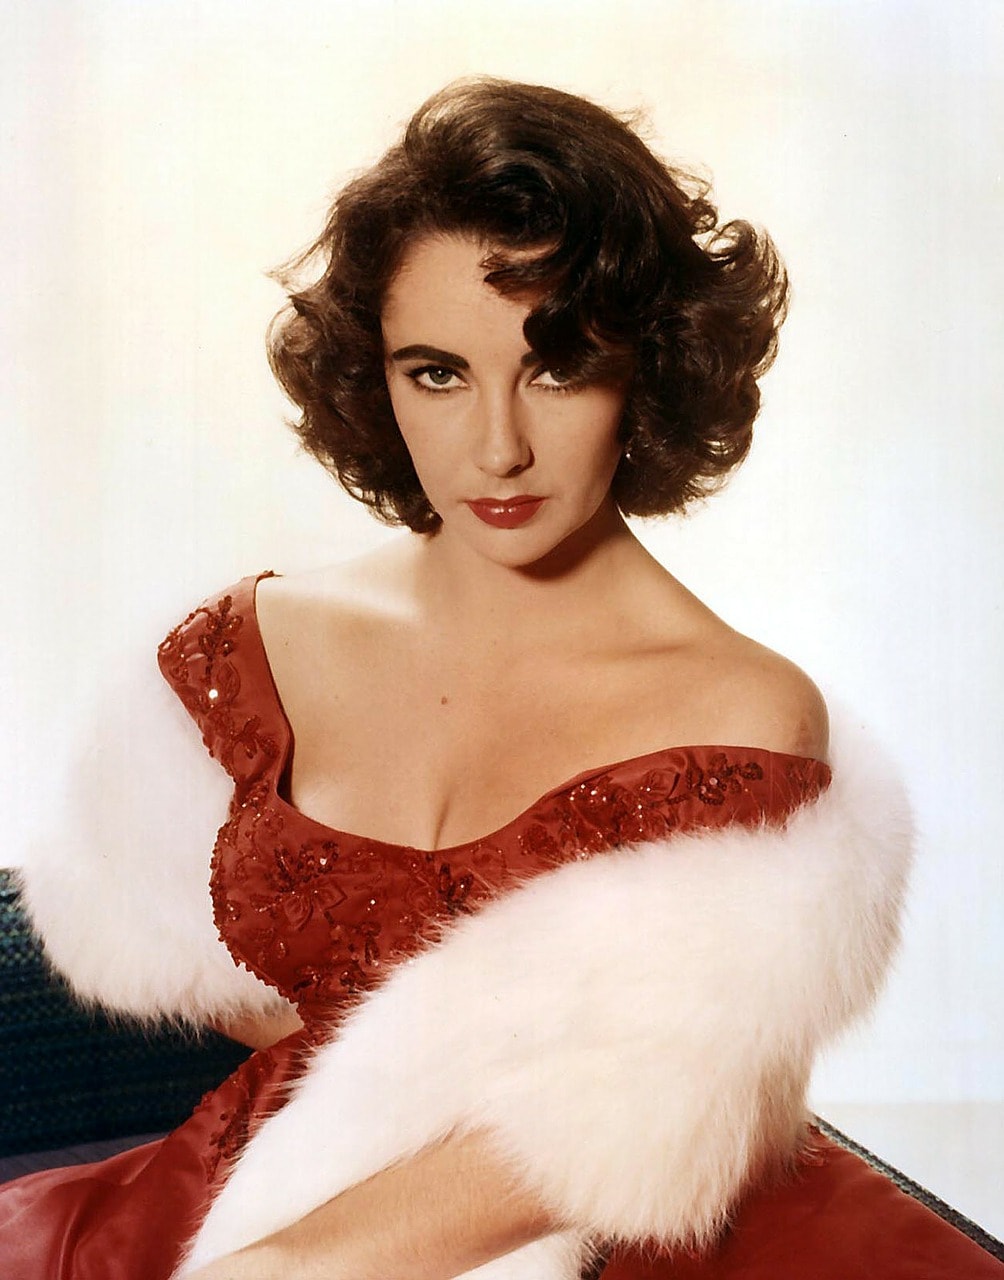
Generally, 1950s makeup was natural, elegant, and chic. Movies started coming out in color, and movie stars, like Audrey Hepburn, Elizabeth Taylor, Grace Kelly, Doris Day, and Marilyn Monroe, were much more approachable because the audience could see the color of their faces on the screens. Naturally, women aspired to look like these starlets and copy their makeup looks.
Main Makeup Elements of the 1950s
After the wartime austerity, the 50s were marked by the boom of luxury cosmetic brands. Cosmetics, in general, became very popular. Different cosmetic products, such as anti-age creams and a wide array of other youth-preserving products, combined with heavy makeup were in the hype.
Makeup was applied in a way to look natural, but there was usually a lot going on. Heavy cake or liquid foundation, or the so-called pancake foundation, was in, with loads of powder to achieve that matte finish.
As far as colors go, the 50s were the era of pastels, from clothes and accessories to makeup. Pastels were popular on eyelids, cheeks, and lips. One of the most iconic looks of the 1950s was the winged eyeliner.
1950s Face Makeup Elements
Foundation: The 50s era of the mask-effect. Foundation came in different formulations, such as liquid, cream, and cake, and it was applied in many layers. It was important for the foundation color to match a natural skin tone since the tanned look wasn’t in anymore.
Contour: Rouge was applied after the foundation to contour the cheekbones. It was blended upward toward the temple to add a healthy skin glow and not directly on the cheeks, as rosy-red blushed cheeks were old-fashioned.
Powder: Finally, to set the foundation and get the overall blended tone, a flesh-colored loose powder was pressed into the skin, using a powder puff. The excess powder would then be brushed away after a few minutes to keep the shine at bay.
1950s Eye and Brows Makeup
Eyeshadow: Matt colored eyeshadow pallets were popular, including shades of brown, blue, gray, green, and purple. Usually, only one color was applied with a finger on an upper lid, and the application was relatively minimal.
Eye-liner: The super-star of eye makeup was unquestionably black or brown eyeliner with an outward flick or wing, which was applied with either darker eyeshadow or a cream liner. Marilyn Monroe was famous for her doe-eyed look, where eyeliner was applied on both upper and lower lash lines. This trend started in the late 40s and continued to be popular by the mid-50s when the iconic cat-eye makeup look took over.
Eyebrows: The eyebrow shape was natural, just like in the 40s, but a tiny bit more touched-up and arched. The general shape was to start thicker and taper out towards the end of the eyebrows, just like today. Liz Taylor, Sophia Loren, and Audrey Hepburn favored a bolder brow shape. They would fill them in with a bit darker shade than their natural eyebrows, while Grace Kelly and Diana Dors, for example, kept them more natural and a little bit more feminine.
Mascara: When it comes to lashes, they were lush and voluminous. However, mascara was usually applied only on the upper lashes in the 50s. Women started applying mascara on upper and lower lashes around the 1960s again.
1950s Lip Makeup
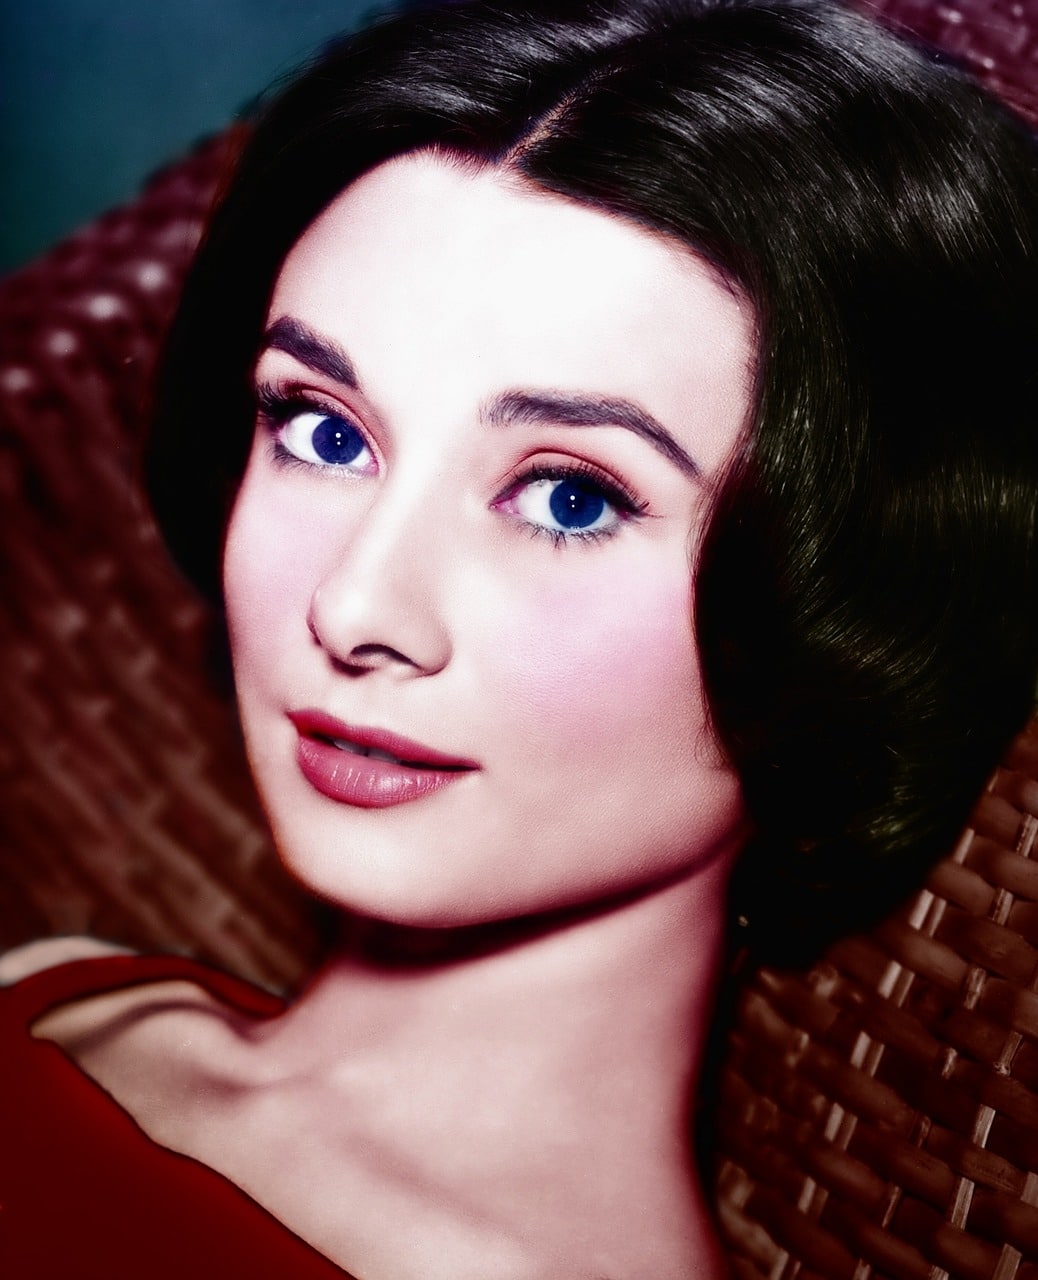
Lipstick: This is the era when pink lipstick became very popular. Audrey Hepburn emphasized the trend by wearing light pink lipstick, and this was something that was extremely popular among younger women.
But the hot-red lip was still much loved, and it was Marilyn Monroe’s trademark. Besides these, the lighter shades, such as orange and coral, were also worn a lot.
When applying lipstick, the natural lip shape was usually followed. Sometimes the lips would be overdrawn to achieve a perfect symmetry or the fullness of both upper and lower lip.
If you’re looking to buy some 1950s shades today, Revlon still makes some of their classic 1950s lipsticks still to ever-growing popularity. This video goes through some of these famous shades.
1950s Nail Polish

The colors for nail polish during this decade matched the colors of lipsticks, so naturally, pinks, reds, corals and maroons were popular hues. Clear nail polish was also a top choice for those who wanted a more subtle style.
Bridal Makeup Tutorial – How to Achieve a Classic 1950s Retro Style?
If you’ve imagined your bridal makeup more natural and subtle with a vintage twist, the 1950s style would be an ideal choice for you. The key features of this makeup look are porcelain pale skin and softly defined lips and eyes with just a hint of color. You’ll feel glamorous and made up while keeping a more natural look.
To create a perfect 1950s bridal look inspired by the popular brides of the era, such as Jackie Kennedy, Grace Kelly, or Debbie Reynolds, follow our step-by-step tutorial:
Step #1. Base:
Prep your skin using a moisturizer and then a mattifying primer. This will give you a smooth base and flawless 50s skin and ensure your makeup stays put throughout the day.
Step #2. Foundation:
Use a liquid foundation with medium to full coverage. Apply it in the center of your face and then blend it outwards, using a foundation brush or a beauty blender. Remember to apply it just a little at a time, as this technique will allow you to build it up if necessary, to even out your skin tone completely.
Step #3. Conceal:
To cover up any imperfections and blemishes, use a concealer that is a tone lighter than your foundation and blend it using your fingers or a small fluffy brush.
Step #4. Powder:
Set everything using a loose powder. Apply only a little bit of setting powder to avoid looking too cakey.
Step #5. Eyebrows:
Fill in your eyebrows with light and feathery brushstrokes. Use a brow pencil or a darker eye shadow and follow your natural brow bone. Make an arch at the third of your brow instead of a rounded shape as it looks more natural.
Step #6. Eye shadow:
Apply a lighter champagne color eye shadow all over your eyelids until the brows to even out any imperfections. Then take a light gray or brown shadow and apply it into your crease and outer corners to deepen out your eyes and contour. You can use another light shimmery shade and apply it on your inner corners. This will make your eyes look bigger and doe-like.
Don’t be afraid to experiment and use neutral shades as the accent shouldn’t be on your eyeshadow but the next steps, the eyelashes and liner. If you never played with eye shadows before, you can practice a couple of days before the wedding and see which shade best suits your eye color.
Step #7. Lashes:
False lashes will give you that perfect almond eye shape and create fuller and natural-looking lashes. However, applying them can be tricky, so you should test them out before the big day. You can use a half lash or individual lashes and apply them to the outer corner of your eyes. Seal them in with one or two coats of black mascara.
If you’re still insecure about fiddling with falsies on your wedding day, we would recommend doing semi-permanent eyelash extensions. Or you can skip this step altogether, and just use your lash curler and a mascara that will give your natural lashes more volume.
Step #8. Eyeliner:
Use a black eye shadow or liquid eyeliner and create the iconic 50s cat-eye winged eye look. Follow your lash line and flick it out on the outside. To ensure your wings are symmetrical, you can use a piece of tape and stick it at the corners of your eyes. Some practice would come in handy with this step as well.
Step #9. Blush:
Use a blush brush and apply a soft pink powder blush onto your cheekbones. Do this pretty lightly as blush wasn’t worn as prominently as it used to be before the 50s.
Step #10. Lips:
If you want to, you can overdraw your lips using a red lip pencil to get a fuller lip, or just follow your natural lip line. Fill in your lips with the same pencil and then go over with a red-ish pink lipstick, which will give you a more raspberry feel. There’s a wide array of different shades of red-ish pinks, and you can choose the one that best suits your skin tone.
Use a long-lasting lipstick or blot your lips on a piece of tissue after the first application and then re-apply it. This trick will give you a really intense color and ensure your lipstick lasts the whole day.
And that’s your 50s makeup look done!
To Wrap Up
Without any doubt, the 1950s makeup look is among the most iconic of all the vintage makeup looks, and it can be adapted to suit anyone. Once you have mastered your wedding makeup, you can explore and make use of beautiful retro hairstyles and gowns to match your glamorous makeup.